Remove Radiator From Wall
Any home water based central heating system can be complicated and something that most people do not want to mess with when it comes to removing the radiator from the wall for decorating!
But one day you may find yourself in a position where you would have to remove a radiator and the most common reason for this is when you need to get behind the radiator for painting and wallpapering.
You may be thinking that this is not a job for you and in most cases, you will need to call upon a professional to remove and refit your radiators which can become costly!
But if you feel competent enough to tackle it yourself these are the steps that are taken as follows:
Removing a Radiator DIY Process
Firstly, to carry out this job You will need the following:
- Spanner
- Radiator bleed key,
- Container to catch the water in
- Plastic sheet or towel to cover the floor to catch any unwanted spillage.
Always make sure you keep towels close in case of spillage as the water that comes out can be very dirty and can stain most surfaces especially if it is your carpet!
We advise that you pay attention to the radiator’s brackets before attempting to take the radiator off the wall, as not removing the radiator correctly can lead to serious problems!
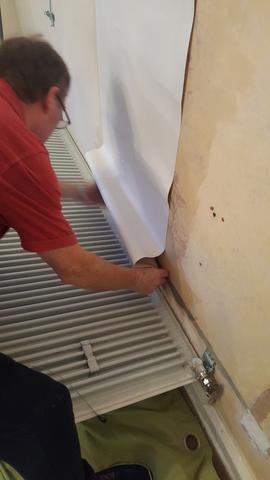
Be prepared as this can become quite a messy job in some instances!
See example pictures of a job that was carried out recently by a DIYer whereby just taking one of the radiators off the wall became quite messy!
Procedures to follow when removing the radiator off wall:
Step 1 - Shut off the inlet and outlet valves.
Step 2 - Place a container under the radiator connectors.
Step 3 - Fit the bleed key ready to let in air to control the water flow
Step 4 – Once you have released the nut at one end of radiator above container and bulk of water has run out repeat the same at the other end of radiator.
Step 5 - When all the water stops running out fully disconnect both outlets then close the bleed valves.
Step 6 – Gently lift the radiator from the brackets and tile the radiator cover to remove remaining water.
We advise you to be cautious as the water could be black and could stain the floor area especially carpet!
Step 7 - Tip your radiator upside down to carry it out of the way, this will prevent any remaining water and drips escaping out of the radiator!
See Blog - Draining Down The Radiator Vs Rotarad Removal Kit
Once you have removed the radiator from the wall make sure also that before you start to decorate you clean away all the accumulated dust and grime that has built up over time, this also includes the skirting.
See Blog - The Importance of Cleaning Your Radiators
This would be the ideal time to consider the Rotarad retrofit kit when re- installing your radiator.
As you can see from the pictures below this allows you full instant access for any future decorating or cleaning, without the need to disconnect or remove the radiator in the future!
See Blog - How To Decorate Behind A Radiator Without Removing It.
Once finished the radiator is then put securely back in place on the wall
Conclusion
By being able to move the radiator in an instant will allow for stress-free quick decorating, wallpapering, and cleaning.
Installing Rotarad enables you to achieve superior standards of decorating and hygiene with instant access to easily maintain ongoing improved standards of hygiene for your home and wellbeing.
Easy access for cleaning and decorating!